In the Garden: DIY Antique Headboard Gate
- Alyson
- Jan 20, 2020
- 3 min read
For those of us who call ourselves gardeners, January brings with it the anticipation of a new season in the garden. We squeal with delight when the seed catalogs arrive in the mailbox, and gleefully plot out in journals, scratch paper, and grids which varieties we will plant, reminiscing about what plants produced excellent crops or bountiful blooms. The time is ripe to begin planning for this year's garden. In many parts of the country spring is a month away as bulbs will begin popping up towards the end of February. Here in the mountains of northwest Montana, spring is many months away. Of course, I'll begin starts in the greenhouse to get a jump on the short growing season.

A fellow gardener asked me about my process for my garden gates. We put in our garden plot years before we began building our home - at the time we were living in the barn. Because of the many woodland critters (we call the deer yard rats around here), a fence was a first step as well. This was long before Pintrest and before we had much money to spare (I'm not talking the dark ages here). The truth is my garden fence is a lesson in practicality and not aesthetics.

We used treated 6" round posts and stock panels to build a fence around the roughly 40' x 50' space, which is never large enough so I usually plant pumpkins, flowers and sunflowers outside the fenced area and then curse the yard rats throughout the summer. To keep them from getting to the garden I string rope around the perimeter of the garden fence. Seriously, they eat everything! Using Casey's old 9N tractor with a post pounder (that is a memory - Casey claims I tried to kill him. I kept popping the clutch and tried to do a wheelie in the tractor), we pushed those 8-foot- posts into the ground. We then used fencing nails to attach the panels to the posts and strung a thin rope around the top to keep those pests from jumping over the fence.

As a compromise for the simple and inexpensive fencing, my gates are pretty and not just functional. Isn't that real life! And really, that's all it takes to make my heart happy. I don't need everything to be perfect and just so. I'm content with the little bits.

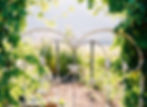
We built arches over the gates using 4" x 4" posts which I've stained, and then attached a 2" x 4" piece on each side across the top. We cut a 45 degree angle to give it character. On the front gate we added a section of lattice on either side so my hops could climb. I also planted peppermint around the outside of the garden fencing and used smaller no crawl wire here as well to help keep out the rodents.

Hanging the gates were was a little frustrating because standard gate hardware at the local store was meant for thicker diameter pipe than the diameter of the antique headboards I had found. So Casey built spacers out of metal to make the gates swing on the hinges properly. I attached wire to the headboards to deter the smaller creatures from eating everything; so sorry Peter Rabbit and friends.

The antique headboards are twin size, so when they are swung open there is ample space for the Gorilla garden cart or a wheelbarrow to pass through. It is also easy to get the tiller into the garden which is important. To keep the gates closed, we attached a horse shoe which was welded to a hinge and then attached to a board which we screwed to the post. I love how it turned out, and it was such a fun project to repurpose these headboards which I had found out junking. They were pretty rusty when I picked them up - but a quick spray paint job brightened them right up. I don't recall how much I paid for them it was so many years ago now, but certainly under $25 each.

I love that this simple project has made my garden a lovely place to work. Opening the gate and walking under the drape of lush greenery in the early morning, is like walking through a passageway to a beautiful little sanctuary - a place where I find solace, creative space and where I am often inspired.